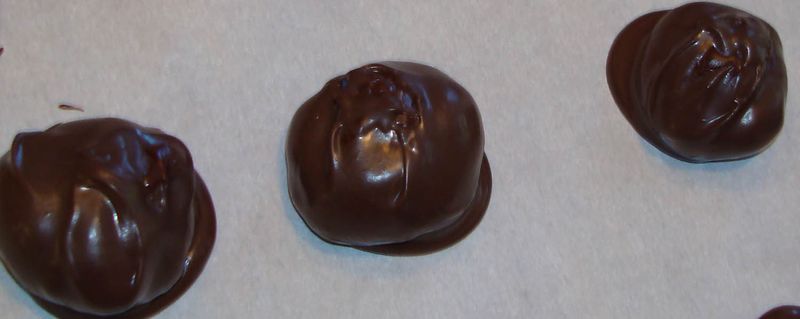
There is nothing like homemade Chocolate truffles. They taste much better than wrapped store bought truffles. Why buy Godiva chocolate truffles when you can make your own for a fraction of the price. I love to make up a batch of truffles to give away and make extras to eat myself. Make sure to use high quality chocolate. Your truffles will only taste as good as the chocolate you use to make them.
My family loves these. They are some of the best chocolates that we have ever tasted. They are not hard to make.
Tools Needed
Kitchen scale to weigh chocolate
2 cup measuring cup
Large microwave safe bowl
Whisk
Disposable food safe gloves
Parchment paper
Sheet pan
Fork or candy dipper
Spoon
6 inch by 6 inch foil candy wraps
List of Ingredients to Purchase
Grocery store items (by location where I find them)
Other aisles
12 ounces dark chocolate
4 ounces milk chocolate
1 cup heavy cream
Sam’s Club around Thanksgiving and Christmas
1 2 ½ pound Ghiradelli double chocolate candy making bar
Recipe steps:
Melt chocolate to make the inside of the truffle.
Ingredients needed
12 ounces dark chocolate
4 ounces milk chocolate
1 cup heavy cream
Large microwave safe bowl
Kitchen scale to weigh chocolate
2 cup measuring cup
Whisk
Weigh out 12 ounces dark chocolate and 4 ounces milk chocolate. Break up the chocolate into pieces. The smaller the pieces, the easier and the faster the chocolate will melt. If you have large pieces, make sure to stir and try to break up the pieces each time you remove it from the microwave. You do not want part of the large piece of chocolate to get too hot and ruin. Make sure to use high quality chocolate with a high fat content. Place the chocolate into a large microwave safe bowl. Warm it for 45 seconds. Stir as much as possible. Heat for an additional 15 seconds. Stir as much as possible. Continue heating and stirring for 15 seconds until the chocolate is mostly melted., Then when it is just small lumps rub the lumps of chocolate into the side of the bowl with the back of the spoon. Do not overheat in the microwave or the chocolate will change consistency and will not be good.
Once the chocolate is melted, set the bowl to one side.
Place the 1 cup heavy cream into the 2 cup measuring cup and place it into the microwave. Heat it on power of 4 for one minute at a time. (where high is 10 and low is 1). Take out and stir and check to see if it is very warm to the touch. Continue heating for 1 additional minute and stirring and checking it until it is very warm to the touch. If you do not heat the cream until it is warm, it will cool the chocolate too quickly and very small lumps will form in the chocolate cream mixture. This mixture is called ganache. It will still taste good with the lumps, but it will be smoother and creamier without the lumps.
Pour the warm cream into the warm chocolate and stir with a whisk until everything is combined and is uniform in color.
Place in the refrigerator until it becomes firm enough to make balls. This should take around 1 hour.
Make ganache balls for the inside of the truffles
Ingredients needed
Ganache mixture
Disposable food safe gloves
Parchment paper
Sheet pan
Once it is firm take it out of the refrigerator and begin shaping the chocolate ganache into balls.
Place parchment paper onto a sheet pan to give a place to put shaped chocolates.
Put disposable food safe gloves on your hands to keep the chocolate from melting all over your hands. Once it becomes firm, use a spoon to scoop out a ball that is about the diameter of a quarter. Place scoop of chocolate into your gloves and roll to make a round ball shape.
Place the ball shape onto the parchment paper on the sheet pan. Continue scooping out chocolate and rolling into balls until you have filled your sheet pan or run out of c
hocolate ganache. You may need to use more that 1 sheet pan to hold all of the chocolates.
Place these sheet pans full of chocolates back into the refrigerator for around 30 minutes to 1 hour to get firm.
Dip the ganache balls into chocolate to make truffles
Ingredients needed
Ganache mixture
1 2 ½ pound Ghiradelli double chocolate candy making bar
Fork or candy dipper
Parchment paper
Spoon
6 inch by 6 inch foil candy wraps
I use an inexpensive candy dipper that I purchased from Hobby Lobby, a local craft store that carries candy making supplies to dip the chocolates. Most stores that carry candy making supplies should sell an inexpensive plastic candy dipping set. I usually the tool that look like a ‘U’, but you can use which ever tool works best for you. You can also use a fork to dip the chocolates if necessary.
Use the Ghiradelli double chocolate candy making bar if possible. It makes a very tasty chocolate coating and it looks nice and shiny since it is a candy making bar. Other chocolate candy coatings that I have used have not tasted very good. The Ghiradelli double chocolate candy making bar tastes very good and you do not have to temper it to get a shiny coating since it is a candy coating. If you use real chocolate to coat the chocolates, you must first temper the real chocolate or the chocolate will not be shiny, it will be dull and will not look good.
Take about half a pound of Ghiradelli double chocolate candy making bar in a microwave safe bowl. Warm it for 45 seconds. Stir as much as possible. Heat for an additional 15 seconds. Stir as much as possible. Continue heating and stirring for 15 seconds until the chocolate is mostly melted, then just stir until the rest of the chocolate is melted. Do not overheat in the microwave or the chocolate will change consistency and will not be good.
Once the Ghiradelli double chocolate candy is melted, begin dipping the chocolates. Place a chocolate ganache ball onto the candy dipping tool and dip the ball into the warm chocolate. Let the chocolate completely cover the chocolate. Remove the ball from the warm chocolate and let the excess drip off. Place the coated ball onto new parchment paper. If you leave the ball in the warm chocolate too long, it will start to melt. It is also easy to have excess around the bottom of the chocolate if enough chocolate was allowed to drip off. This method will give a thicker outer layer that the other method below. I like the thicker outer layer. It seems to help the chocolate last longer. Once the chocolate has dried, check the sides, and especially the bottom of the chocolate, to make sure that no ganache is showing. If you see ganache, use a spoon to spread a small amount of warm chocolate candy onto the finished chocolate to cover the ganache and turn that side up to the air and let the chocolate piece dry once more on the parchment paper.
Another method is to use your hand to cover the ganache ball with chocolate. To do it this way, p
lace a small amount of the melted chocolate into the palm of your hand. Using the other hand, place the ball into the chocolate that is in the palm of your hand. Use your fingertips to roll the ball around in the chocolate until it is evenly coated with a thin layer of chocolate. Place the coated chocolate onto new parchment paper and let dry. Let set for about 15 minutes at room temperature and then repeat this process to apply a second thin coating to each piece.
I always wrap each truffle into 6 inch by 6 inch foil candy wraps. You should be able to purchase the candy foil from a candy making or cake decorating specialty store. It makes the truffles look nice and helps them stay fresh longer. I have eaten truffles that were 1 month old and they were still just as good as when I first made them.


