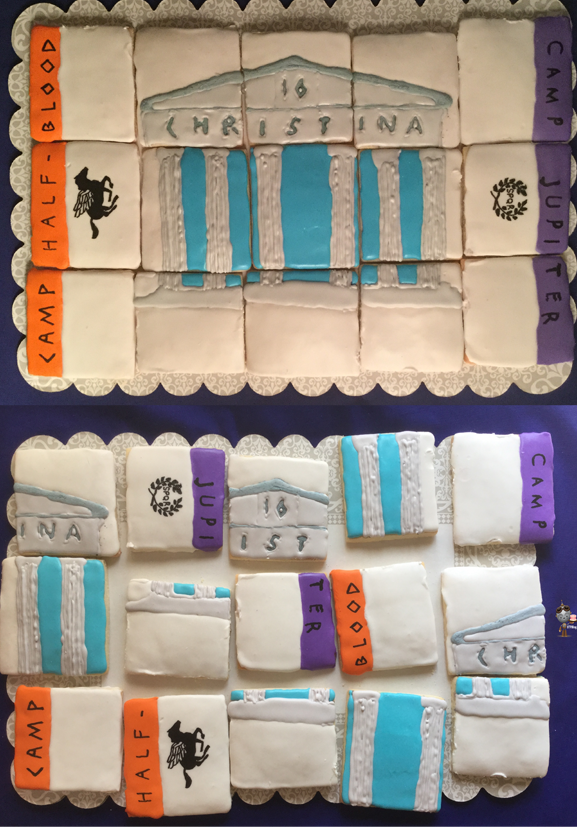
I made this Percy Jackson Puzzle cookie recently. Since this was my first puzzle cookie, I learned some things that I wanted to share with you.
1. First I determined the size that the finished cookie needed to be to feed fifteen people, and to fit on a cake board.
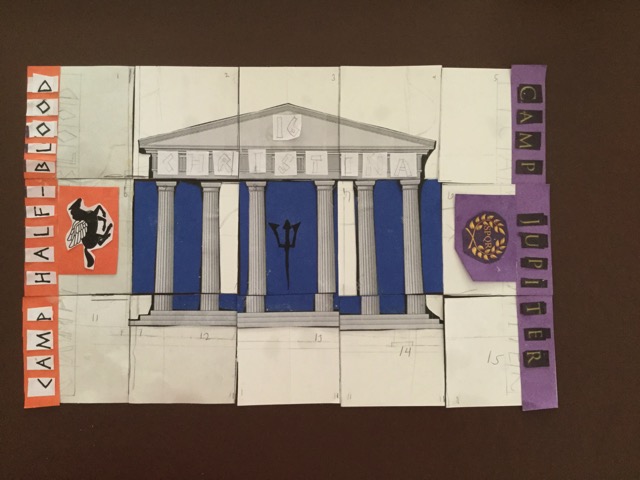
2. I started with a theme – Percy Jackson. I made a design using paper. I used construction paper to add color. This way I could have an idea of what the finished cookie would look like. I glued separate letters to the paper. I suggest covering the design with clear packing tape if you plan to use it more that once.
3. I had to decide where the dividing lines would go so that a detailed design was not split by a dividing line. I also had to divide it so that I had at least fifteen decent sized cookies. I could have used jagged puzzle shapes, but for this particular design, I thought straight lines worked better. I drew lines on the picture and cut the picture into the puzzle shapes desired.
4.I used the puzzle pieces as a template for the size and shape of the dough for each cookie. I floured the cookie dough lightly so that the templates did not stick.
5. It is very important to use a dough that does not expand and that keeps its original shape. For this puzzle cookie I used a cookie dough that did expand because it makes a great tasting cookie and the customer had it before and really liked it. It expanded more that I remembered and the cookies tended to have rounded edges, meaning that the cookies sloped down slightly on the edges. The cookies had to be iced to the edge since they were puzzle pieces that fit together which made the icing run down the edge.
6. The dough was a bit sticky so I had to add a little bit of flour. I recommend chilling the dough before and after cutting the cookies and before baking.
7. The cookies tended to change their shape a little when they were moved so I chilled the cut cookies in the freezer for about 30 minutes before moving the design. Once chilled in freezer they held their shape. (I could have cut the cookies on parchment and just cooked on that parchment, but since it was straight lines, it was easier to cut out the cookies from one large piece.)
8 I using an edible marker to place a small number on each cookie and on the template piece so that I would know which cookie it was after it was baked. Even though the cookies were rectangles, they were not all the same size rectangle.
9. To make the finished expanded cookies the correct size, I used a very fine toothed grater to shave the cookie down. This had to be done very gently to keep the cookie from cracking. It worked fairly well to place the cookie on the table with one side pointing up and move the grater gently back and forth over that edge until enough cookie was removed. If you use a dough that does not expand you should only need to do minimal sanding.
10.I iced the cookies with thinned royal icing. Since the cookies had rounded edges, I used a toothpick to clean off the edge when the icing ran down. If it ran down an outside edge of the puzzle I did not clean it off unless it ran off the cookie. I also used a sharp knife after the cookie dried to get rid any excess icing that kept the puzzle pieces from fitting together correctly.
11. I used the iPad program Camera-Lucida to trace the designs and letters onto the cookies using an edible marker.
12. As I drew out the design on each cookie, I made sure that the designs like the columns were lined up on adjoining cookies.
13. To get the letters hollowed out, I traced around them with icing and then filled all around them, leaving the letters without icing. I used edible colors to paint the letters.
14. For transport, I wrapped each cookie in wax paper and put them in a zip loc bag. I placed the bags flat in a sturdy box. I included a cake board as a place for the customer to arrange the cookies.
15. I suggested that the customer display it scrambled and let the kids at the party assemble it. I gave them a picture of what the cookie should look like assembled.
I hope these tips help as you make your puzzle cookie. Have a great time as you create new edible masterpieces.

